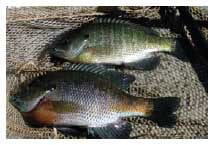
Bluegill, often called bream, brim or perch, are among the most popular and widely known sunfish species as they are an enjoyable sport fish for anglers. Besides being an excellent sport fish, bluegills can be produced and sold to various aquaculture markets, including recreational pond stocking or food-fish production. Various marketing opportunities are available at three primary bluegill growth stages:
- Fingerlings (2 to 4 inches) for initial pond stocking and for remedial stocking
- Sub-adults (4 to 7 inches) for remedial or advanced pond stocking or for stocking in cages for food fish production
- Larger size classes for food markets, remedial pond stocking and trophy fish stocking for special fishing programs
Each of these products provides a marketing opportunity for Missouri producers.
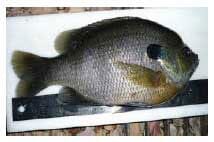
Food markets typically demand a bluegill that weighs from 3/4 to 11/4 pound at harvest (Figure 2). Production of a food-sized fish with a marketable fillet has typically taken over three years, precluding the bluegill from being a profitable aquaculture species to produce. However, research conducted to better understand bluegill feeding preferences, hybrid growth and vigor has resulted in the development of improved brood stock and culture techniques. These techniques have reduced the production time needed to raise food-sized fish in a sustainable and profitable manner.
Life history and reproduction
Understanding the life history of a fish species is essential for successful aquaculture production. Of the 11 species in the genus Lepomis, four have been widely cultured as sport fish. Research has shown that several species have potential aquaculture uses as food fish, including bluegill, redear sunfish (L. microlophus), warmouth (L. gulosus), green sunfish (L. cyanellus) and their various hybrids.
Bluegills progress through seven stages of growth: egg, larva (initially with yolk sac), post-larva (fry), juvenile, fingerling, sub-adult and adult.
Bluegills are fast-growing and prolific spawners. Bluegill males will fan out a spawning bed 6 to 12 inches in diameter in shallow water, clustering as many as 50 beds together. They spawn multiple times in a season and, as adults, provide parental care to their spawn. Spawning begins as water temperatures warm during early spring and will continue in many locations until late summer or early fall. Males typically expend a great deal of energy during the reproductive process. They build nests and attract females to them. Each female can produce as many as 80,000 eggs during the spawning season and may lay eggs in more than one nest. The males fertilize the eggs by releasing milt across the egg mass, fan the fertilized eggs to keep the nest clean, and aggressively defend their nests. The eggs incubate in one to six days at temperatures above 70 degrees F.
Sexual maturation occurs at a very early age; fish hatched in early spring can spawn later the same year. Multiple spawns in a pond or lake result in several ages and sizes of bluegill, all competing for limited food. Bluegills develop hierarchies with dominant and submissive individuals within a particular population. The dominant fish usually have faster growth rates because they can out-compete the others for food. Genetics also plays an important role in determining the size and dominance behavior of individual fish. For example, often a bluegill population will have many different sizes of males of the same age class. The smaller males, referred to as "sneakers" or "satellites," would probably not grow to larger sizes no matter how much food is available. Therefore, during the production process, fish producers often try to separate fish by size. This separation procedure, called culling or sorting, results in a population of fish of a standard size class, which can more easily be managed and marketed.
Two successful strategies can be used for spawning and producing bluegill:
- Pond spawning techniques and production
- Indoor spawning techniques and production
Once larval bluegill are produced using either pond or indoor techniques, they can be stocked into production ponds or indoor recycle systems (RAS) for grow-out.
However, ponds must be prepared properly before they can be used for spawning and growing out bluegill for food markets.
Spawning and producing bluegill in ponds
Pond preparation
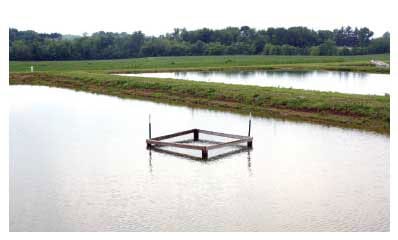
Bluegill can be successfully produced in ponds in Missouri (Figure 3). Ponds designated for bluegill production and culture must be properly prepared so that adequate sources of natural foods, such as zooplankton and insect larvae, are readily available once the fish eggs hatch and the larvae begin to feed. Before stocking a pond, analyze important water quality parameters and, if needed, implement a pond fertilization regime to stimulate the growth of phytoplankton and populations of zooplankton.
Important water quality parameters for bluegill production
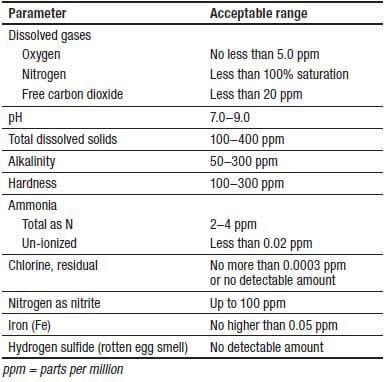
The water quality parameters listed in Table 1 need to be analyzed before fish are stocked. In addition to providing basic water chemistry information, this analysis will help you determine if the pond should be fertilized.
Pond water with low alkalinity, or total hardness, requires the addition of lime for a fertilization regime to be effective. Plan to apply 1 to 3 tons of lime per acre based on the pH of the soils at the bottom of the pond. Lime should be applied before a fertilization program is implemented, preferably during the fall and winter months. Agricultural lime does not readily dissolve in water but can be used if applied before the pond is filled and stocked with fish. If the pond has already been filled, use a finely ground form of lime that more readily dissolves in water. The application of lime increases the alkalinity level and provides water quality conditions that are more favorable for fish survival and growth. A soil test is highly recommended to determine lime requirements. Samples can be sent to the Soil and Plant Testing Laboratory at the University of Missouri for lime and other fertility recommendations. Visit the lab's website, http://soilplantlab.missouri.edu, for soil sample collection and submission instructions.
Table 1. Acceptable water quality parameters for bluegill.
Water quality and fish diseases
Most diseases of fish and aquatic organisms are caused by a specific set of conditions that initiate a fish kill, or epizootic. Usually, adverse conditions caused by stress, poor water quality and the presence of disease organisms are necessary to initiate problems. Normally, many of these organisms exist in the pond at all times; however, problems result under certain conditions. Successful fish producers understand the relationships between water quality and fish growth; thus, a good fish manager is simply a good water manager.
Excellent water quality is essential for finishing fish to market size, whether they are raised in RAS systems or in ponds. Key water quality parameters are dissolved oxygen, ammonia and pH. Dissolved oxygen (DO) and ammonia (NH4+) levels can be limiting factors in any culture system. The pH level serves as an indicator of phytoplankton and algae activity, especially in ponds.
In a pond, certain water quality parameters, particularly dissolved oxygen (DO) and pH, fluctuate daily (Figure 4). A pond with adequate phytoplankton will produce oxygen during daylight hours but use oxygen (respiration) during the night. Most phytoplankton are capable of producing oxygen through photosynthesis and using carbon dioxide (CO2) to produce oxygen (O2) plus simple sugars.
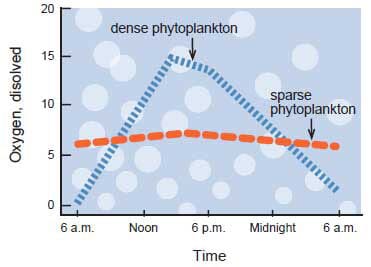
Carbon dioxide originates from the carbonate complexes within the water, or is produced by phytoplankton, algae and the biological activities of aquatic organisms. Daily fluctuations in DO and pH occur naturally in a pond because of oxygen production and the utilization of carbon dioxide.
Carbon dioxide in water forms a weak acid, and as CO2, is used up by phytoplankton during the daylight hours, pond water pH increases because of the loss of acidity. On warm sunny days, an increase of pH can be expected. The rate at which the pH increases can be an indicator of how low the oxygen level may get during the night. During hot weather and cloudy days, oxygen depletions can be expected, particularly in heavily stocked ponds. DO levels must be monitored regularly and remedied if necessary: Monitor the DO levels of the pond during the evening and early morning hours at regular intervals and be ready to add supplemental aeration if DO concentrations fall below 4 to 5 ppm (parts per million). Oxygen and pH can easily be measured with meters purchased from aquaculture supply companies. These meters are necessary for pond water quality management. Decreases in oxygen and increases in pH will stress fish and may be the forerunner of a disease problem.
A decrease in feeding activity is often the first sign of stress, which can lead to a disease problem. Stress is often a result of a water quality problem, so daily monitoring is an extremely important management activity.
Development and management of plankton community
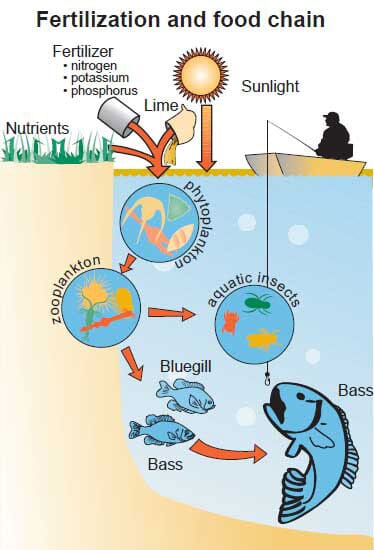
The plankton community is made up of phytoplankton (macroscopic algae) and zooplankton (macroscopic animals), which are classified as rotifers, cladocerans or copepods (Figure 5). Phytoplankton provide food for zooplankton, which in turn are food for larval bluegill. This food chain is the basis for a healthy fish pond (Figure 6).
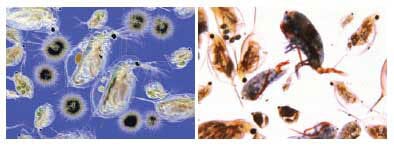
High densities of zooplankton must be available as an initial food source for the larval bluegill. After about two to three weeks, post-larval bluegill can consume prepared commercial food.
Proper management of the zooplankton forage base — the phytoplankton bloom — is critical to the successful transition of sunfish from the larval to the fingerling stage of growth. The status of the zooplankton and phytoplankton communities also gives insight into water quality parameters and the possible success or failure of the fish production season. Depending on water quality measurements and soil fertility within the pond watershed, a fertilization regime may be necessary to establish and maintain a satisfactory phytoplankton bloom (Figure 6).
Pond fertilization before stocking
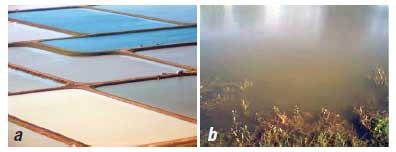
Nutrients are needed for adequate phytoplankton growth and establishment of the food web within the pond. A proper fertilization regime is important: Too many nutrients will cause excess blooms and water quality problems; too few will not allow the production of an adequate phytoplankton bloom and resulting zooplankton (Figure 7a).
If a fertilization regime is to be implemented, it should begin at least four weeks before brood fish are stocked into the pond. Begin the fertilization regime in early spring before pond water temperatures reach 60 degrees. Water temperatures usually reach these levels by late April to early May, depending on your location in the state. Apply fertilizer weekly, and monitor the water quality after each application. Apply 2.5 pounds of nitrogen (N) and 15 pounds of phosphorus (P) per acre. These rates are achieved by applying 32 pounds of super-triple-phosphate and 100 pounds of alfalfa meal per acre during each application. Other organic fertilizers may be used as sources of nitrate, although green manures are not usually adequate and often cause water quality problems.
The soil fertility also influences pond production. Ponds in northern Missouri are generally more fertile than those in the south.
A pond that has been fertilized for maximum zooplankton will have a definite coffee color (Figure 7b). The goal of the fertilization program is to promote the growth of large, reproducing zooplankton populations so this food source will be available when bluegill brood stock are introduced into the pond for spawning. Adequate phytoplankton and zooplankton populations will also reduce sunlight transmission in the pond water and prevent unwanted algal blooms and an overabundance of other aquatic vegetation.
Pond spawning techniques for bluegill
Bluegills spawn repeatedly throughout the summer, leading to a pond that may contain fingerling fish of many sizes. One way to prevent multisized populations is to restrict the frequency of spawns by stocking a predetermined number of sexually mature adults, or brood fish.
Spawn-limiting enclosures
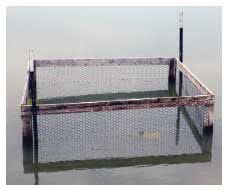
Multiple spawns resulting in young fish of different ages and sizes can be limited by containing the brood fish in enclosures and controlling the number of times they spawn. Enclosures are easily constructed by attaching screening to 1-by-2-inch boards and stabilizing the structure with T-posts (Figure 8). The bottom screening should overlap and be secured to the bottom with weights because if an escape route is available, the adults will squirm under and leave the enclosure.
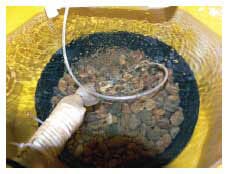
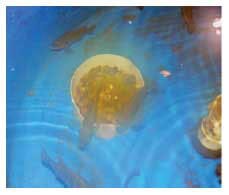
Artificial nests can be built using any type of plastic tub that is about 8 inches in diameter and 4 inches deep (Figure 9). Half-fill the tub with small 1/4- to 1/2-inch rocks. Put two to four nests in the enclosure. A 12-footby- 12-foot enclosure with two to four nests is adequate for a quarter-acre pond. Stock brood fish at a sex ratio of two females to one male; make sure that only one male is on each nest. When one male is stocked per nest in the enclosure, the males can adopt the spawning site and defend a territory (Figure 10). Pre-spawn feeding As soon as water temperatures reach a level that stimulates feeding activity (55 to 60 degrees F) and before spawning, begin feeding the brood stock a 1/8- to 1/4-inch floating or sinking pellet that is 36 per cent crude protein. Feed as much as the fish will eat to satiation, that is, until they stop feeding, on a daily basis; typically, about 2 to 3 per cent of their body weight. Do not feed when adult brood fish have been stocked in the spawning ponds or enclosures. Spawning and nest removal Bluegill eggs hatch within 36 hours of being laid and fertilized if water temperatures remain at about 70 degrees F. Observe nests daily for the presence of viable eggs and larvae that appear in the gravel. Bluegill larvae are about the size of the tip of a sharpened pencil and appear opaque or have a pearl cast. Daily observation is very important because if the nests are not removed at the right time, the adults may consume the larvae or deposit multiple spawns in the same nest.
Pre-spawn feeding
As soon as water temperatures reach a level that stimulates feeding activity (55 to 60 degrees F) and before spawning, begin feeding the brood stock a 1/8- to 1/4-inch floating or sinking pellet that is 36 per cent crude protein. Feed as much as the fish will eat to satiation, that is, until they stop feeding, on a daily basis; typically, about 2 to 3 per cent of their body weight. Do not feed when adult brood fish have been stocked in the spawning ponds or enclosures.
Spawning and nest removal
Bluegill eggs hatch within 36 hours of being laid and fertilized if water temperatures remain at about 70 degrees F. Observe nests daily for the presence of viable eggs and larvae that appear in the gravel. Bluegill larvae are about the size of the tip of a sharpened pencil and appear opaque or have a pearl cast. Daily observation is very important because if the nests are not removed at the right time, the adults may consume the larvae or deposit multiple spawns in the same nest.
When larvae are present, remove the brood fish. After about three days, the larvae will swim up, and at this time the nests can be removed and transferred to the fertilized rearing ponds. If the fish are still in the larval stage, provide gentle aeration using an air stone with a simple aquarium pump.
Larvae and fry nourishment
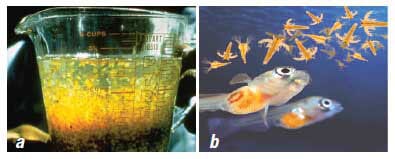
Bluegill larvae are in the yolk sac stage when they first hatch. The yolk sac provides initial nourishment. These fish have tiny mouths as they begin to feed (Figure 11a). Food small enough for them to eat must be available for these fish to develop into fry, otherwise the fry will be severely malnourished. Small artemia, or brine shrimp, can be fed to larval fish.
Once fish absorb their yolk sacs, an adequate supply of food must be consistently available to produce fry capable of foraging for food (Figure 11b). Feed frequently to ensure that enough food is available. Frequent feeding also reduces the development of social hierarchies within the bluegill population. Social hierarchies develop when a few dominant fish begin chasing other fish and not allowing them access to feed. As discussed above, this social behavior can be prevented by implementing a sound feeding regime.
Indoor spawning techniques for bluegill
Bluegill can also be successfully produced indoors using specially designed culture systems (Figure 12). Indoor spawning, hatching and larval bluegill rearing is timeconsuming and requires specialized equipment and skills, but many of the risks associated with pond spawning can be reduced if the operation is well-planned.
Conditioning adult brood fish for spawning
Adult bluegill fish used for brood stock must be conditioned with temperature and photoperiod (time of day length). Conditioning requires that the water temperature be maintained at or about room temperature, 75 degrees F, and that the fish receive a minimum of 16 hours of daylight per day. After a period of at least two weeks, slowly reduce the water temperature to 55 to 59 degrees F and reduce the amount of daylight to no more than 8 hours per day. Keep temperature and daylight constant for a minimum of four weeks, to simulate winter conditions.
After four weeks, begin the process of raising the water temperature to at least 74 degrees F and increasing daylight to 16 hours over a two-week period. Most bluegill will spawn at a minimum of 74 degrees F. In indoor culture systems, however, spawning may not begin until water temperatures are a few degrees higher than 74 degrees F. Maintain water temperature and daylight hours for the duration of the spawning period.
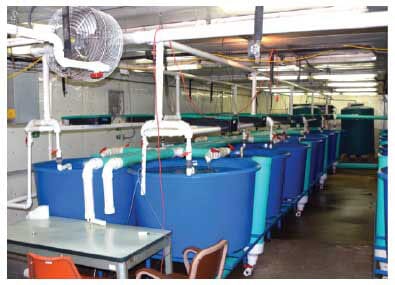
Once the males have been conditioned, they can be placed in a 40- to 75-gallon aquarium that has a continuous supply of high-quality water. Do not allow the water quality to deteriorate during the spawning period. A pre-constructed nest (similar to the artifical nests described under pond spawning) can also be placed into the aquarium at this time.
Brood fish spawning behavior
When the males start to show signs of using the nest, (characterized by the brood fish swimming in circles on the nest and moving gravel with a sideward motion), place a female of similar size into the aquarium. Watch carefully, and if the male does not show signs of adopting the female and attempting to herd the female onto the nest, introduce another male, referred to as a teaser male, to provide competition.
As the pair becomes more interested in spawning, spawning behavior will become more intense. The male will begin to guard the nest vigorously and chase away any other fish, except the chosen female. The male will also continue to swim in a circular pattern over the nest and attempt to lure the female onto it. Before spawning, both fish will swim fast and furiously and the female will pick up rocks from the nest.
The more aggressive the male becomes, the more likely that the pair will spawn within the hour. When spawning occurs, the male and female will attain a lateral, sideways position, and the eggs and milt will be deposited at the same time. Fertilized eggs are adhesive and will deposit onto the rocks. After spawning, the adults should be removed from the aquarium. A small air stone with air should be suspended just above the rocks in the nest.
The nest can be gently removed from the aquarium and put into a small tank with a fresh water supply. Air must be supplied to the transferred nests to keep the eggs from developing fungal infestations. Eggs will hatch in about 32 to 48 hours, depending upon the water temperature. After hatching, the larvae will remain in the gravel until their egg sacs are absorbed; then the fish will begin to swim up. These post-larval fish are now capable of eating food, so hatched artemia, or brine shrimp, must be fed hourly at least 10 to 12 times a day for a 21-day period.
Feeding bluegill
Feeding larval bluegill brine shrimp
As discussed earlier, larval sunfish are not able to eat commercial feeds immediately after yolk sac absorption. They can, however, consume brine shrimp, which is a readily available food that helps larvae develop into fry. Research indicates that feeding bluegill larvae a diet of brine shrimp on an hourly basis, for a minimum of 10 hours a day for 21 days, leads to excellent survival rates and healthy fry development. Success depends on the quality of brine shrimp, so do not skimp on price when purchasing brine shrimp cysts.
Brine shrimp can be purchased commercially as either a frozen ready-to-feed product or a culture. Hatching your own brine shrimp from a culture is the less expensive option but is very labor intensive. Determine which method will work best for your situation.
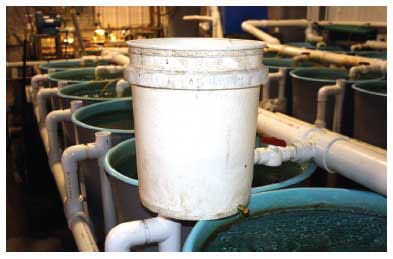
Feeding brine shrimp to bluegill larvae can be a time-consuming process. A simple apparatus that feeds continuously for two hours can be made by fitting smalldiameter flexible tubing with a screw clamp or tubing valve at the end into a hole in the bottom of a bucket (Figure 13). Hang a bucket above each larvae-growing unit, and adjust the clamp or valve to deliver the amount desired as a drip. Add enough water to each bucket of brine shrimp so that the bucket drains completely. Do not use tap water because it may contain chlorine or other treatments. Instead use water obtained from a tank rearing system or that has been filtered to remove the chlorine. The empty bucket can be replenished with brine shrimp and water for continued feeding. Include an airstone with air in the bucket to keep the brine shrimp in suspension.
Culturing brine shrimp
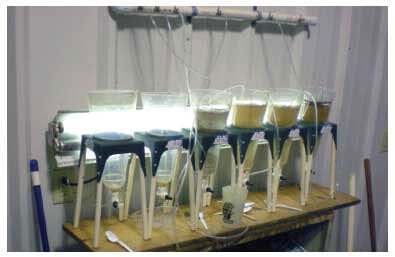
Brine shrimp cysts, or eggs, are dormant. For brine shrimp to become edible food, the cysts must be cultured so that they hatch on a consistent and dependable basis. Hatching systems are available for purchase or can easily be made using plastic bottles, tubing and a value screw clamp or clamp valve (Figure 14).
Any container that holds at least a liter of water and is wide at the bottom and narrow at the top can be a culture container. Even a large plastic soda bottle will work. Cut off the wide bottom at the base, and invert the bottle so that the narrow opening faces down. Fit the narrow part into an L connection with a PVC tap. Graduated pieces of PVC pipe may be needed to match the hole in the container to the tap. Finally, securely seal all the connections with a high-quality silicone, such as aquarium seal.
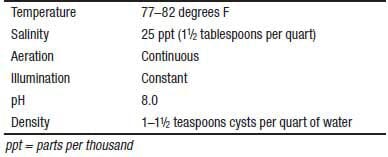
Use tank water when culturing brine shrimp, even though the facility may be supplied with well water; well water is generally 58 degrees F, which is much cooler than tank water, and usually lacks dissolved oxygen. The salinity of the water should be 25 part per thousand, which is about 11/2 tablespoons of un-iodized noncaking salt or rock salt per quart of water. Put water and cysts into a culture container — 1 to 11/2 teaspoons of cysts per quart of water, and fill the brine shrimp hatcher to about an inch from the top of the container.
The goal of these culture containers is to prevent the brine shrimp from settling to the bottom. To keep the culture in suspension, suspend an air stone operated by a simple aquarium air pump in each culture container.
Suspend a light above the containers and keep it on to help maintain the optimal temperature of 82 degrees F and to provide the light necessary to trigger the hatching mechanism. The brine shrimp will hatch in about 24 hours. Table 2 lists the optimal cultural conditions for hatching brine shrimp.
Set up enough culture containers to ensure a continuous harvest. A constant supply of hatched brine shrimp must be available to the fish until they are large enough to eat a commercially prepared diet.
Table 2. Optimal conditions for hatching artemia (brine shrimp).
Harvesting brine shrimp
Brine shrimp contain their highest nutritional levels shortly after hatching. Also, brine shrimp are live organisms that can swim and are most easily captured by fish larvae at this early stage. Therefore, the timing of the harvest is extremely important. The brine shrimp can be harvested from each culture container every 24 hours. A new batch of brine shrimp should be used for each feeding.
Before harvesting, move the light to the bottom of the container for a few seconds. This will cause the brine shrimp, which are phototropic, or attracted to light, to concentrate at the bottom. Remove the light and air stone, and wait five minutes to allow the empty or unhatched cysts to float to the top. Then remove the surface layer of cysts and harvest from the bottom by draining the brine shrimp culture into a bucket or other container.
Feeding larval bluegill a commercially prepared diet
Feeding brine shrimp to the bluegill larvae takes place during the first two to three weeks of the eggs hatching. During the last week of using brine shrimp, the larvae will begin to absorb their yolk sacs and swim up, indicating they are ready to feed. At this point, begin feeding these advanced larvae a commercially prepared diet. Highquality larval feeds are available from aquaculture feed manufacturers. The food particles must be very small, contain a minimum of 50 per cent protein and have high lipid, or fat, content. Commercially available larval feeds may contain attractants such as krill meal.
Table 3 provides feeding recommendations for various size classes of bluegill during the production process.
Table 3. Bluegill feeding recommendations using a commercially prepared diet.
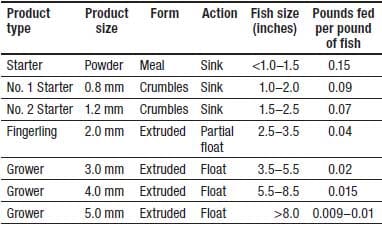
When bluegill larvae have fully converted to the prepared diet, they may eat up to 10 per cent of their body weight daily. Larvae and fry must be fed continuously during the daylight hours. Once they have reached the post-larval, or fry, stage, the fish may be either stocked into fertilized ponds or moved indoors to larger containers that have more optimal water flow.
Indoor feeding methods
Feeding fry indoors is labor-intensive, as the fry must be fed at least 10 times a day. However, commercial feeders are available that dispense feed continuously over 12 hours or have timers that are set to feed at specific intervals.
The small fish are very vulnerable to parasites and other disease organisms, so maintaining healthy tank conditions is essential. Most fish diseases occur because of poor water quality resulting from accumulated feed and waste not being adequately removed from the rearing tanks.
Tanks used for producing fry must be thoroughly cleaned daily. A simple cleaning device can be made by fitting a 1/8- inch by 18- to 30-inch PVC pipe with a length of surgical tubing. Using the device, carefully siphon debris into a bucket. If small fish are siphoned in the process, they will be caught in the bucket and can be netted and placed back in the culture tank. Siphon waste and uneaten feed from the tank bottoms each day.
As individual fish grow larger, the rate of feed consumed each day will decrease. As a general rule, the daily feeding rate of a 4-inch fish will be about half that of a 2-inch fish. However, the total amount of feed used will increase because of increased fish weight.
Fish that are properly cared for, fed on a consistent basis and kept in tanks that are routinely cleaned should weigh about 3 ounces when they are 2 inches long. Fish of this size are marketable and can be sold as stockers, or they can be finished to a larger size indoors or stocked in ponds during mid-April so that they can be fed out to a larger size.
Pond stocking and feeding methods for producing food-sized fish
Stocking ponds with 2-inch fish is the least expensive and most efficient method of rearing fish to a larger size. For fingerling production, stock ponds at a density of 6,000 to 15,000 fish per acre, depending upon the final size needed at harvest. The size of the fish harvested from a pond is somewhat density-dependent (more fish = higher density): high stocking rates lead to smaller fish, and low stocking rates lead to larger fish.
Feeding rates will vary based on the size and density of the fish stocked in the pond. The feeding rate is the amount of feed fed daily as a per centage of the body weight of the fish. Generally, fish eat about 3 per cent of their body weight daily during the grow-out period, which is typically from May through October.
One method of determining the correct amount of feed to use on a daily basis is to calculate the total weight of the fish at stocking and feed 3 per cent of their body weight throughout the growing season (see Table 4).
Table 4. Expected length and weights of bluegill corresponding with recommended daily feeding rates.
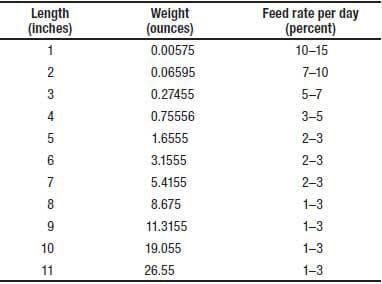
Another method of determining how much feed to use on a daily basis is to determine the amount of feed required for the fish to reach satiation. Feeding to satiation is a process in which feed is offered until fish stop feeding. Although feeding to satiation is time-consuming, total weight gain of all fish in the pond has been shown to be the greatest when this process is employed.
If feeding to satiation is not possible or practical, automatic feeders can be used. The amount of feed to be put into the feeder is based on the total weight of the fish.
Store feed in a cool, dry place, (ideal temperature is 40 degrees F). Moldy feed has lost its nutritional value and must be discarded. Feed generally has a six-month shelf life, so be sure to check the expiration date when buying feed.
Most fish in the sunfish family do not feed well during the middle of a sunny day, thus early morning and evening are the best times to feed.
The primary goal for successful production of fish for food markets is to produce the largest fish, or target weight, in the shortest possible time at the lowest possible cost. By calculating the anticipated growth rate and multiplying the number of days in culture, you can determine when the fish are expected to be a particular size. With a known delivery date and size required, you can calculate when fish should be spawned. These calculations come more easily with experience, but, in general, daily weight gain can be estimated by dividing the amount of feed fed daily by 1.5. Between this number and the feed rates listed in Table 4, a producer can roughly calculate growth rates and ideal spawning times.
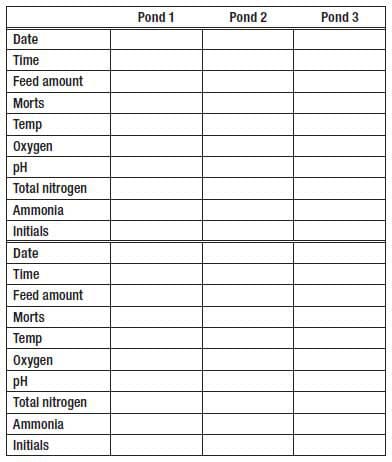
Producers can monitor and gain knowledge about their particular operations by keeping records on feed consumption, unusual behavior, water quality parameters and the number of dead fish removed daily from the system. Figure 15 provides an example of a standard form for keeping daily water quality and feeding records for each pond.
Harvesting and transporting
Harvesting bluegill from production ponds or tanks should be planned well in advance and done based on the desired end product. Sales of live fish require transportation needs to be coordinated so that the buyer is ready to accept the live fish at the time of delivery.
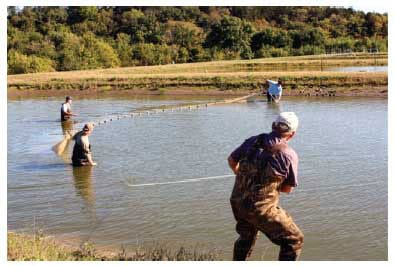
Harvesting equipment will vary depending on whether fish are in a tank or a pond. Pond harvesting generally requires a seine longer than the pond width so that the seine will open like a bag when it is dragged through the pond (Figure 16). At least one person for each side of the pond bank is needed to pull the seine. Bluegill are extremely sensitive to warm temperatures, so fish should not be hauled and handled if water temperatures are above 60 degrees F.
Equipment to tank harvest depends on the size of the tank. Of course, good dip nets are needed, but if the tank is large, a crowding mechanism will also be needed so the handling can be done quickly. If fish are in tanks where the water temperature is higher or lower than desired, they must be slowly conditioned to the desired temperature. The recommended rate of temperature change is 3 degrees F every 15 minutes. Fish handle much better at lower temperatures if they are conditioned to the temperature.
When transporting fingerling fish for stocking, a producer must take extra precautions to ensure the fish arrive healthy. Adding a maximum of 1 per cent iodine-free salt to the hauling water will enhance survival rates. The salt will knock off some parasites and calm the fish during transport. Large bluegill are more salt-tolerant than smaller fingerlings. After the haul, thoroughly clean the unit to prevent the equipment from rusting. Another good practice is to disinfect transportation tanks after a haul to prevent contamination of your facility.
Be sure to take plenty of nets and plastic buckets to help in transporting and stocking fingerlings into the pond.
Transporting fish between states
Interstate transportation of fish and their eggs is regulated independently by each state. The authorizing agency is typically the U.S. Department of Agriculture (USDA), but in some states it is the state agriculture, conservation or natural resources department or agency, or a combination. Be sure to check state regulations before crossing state lines with a load of fish.
Interstate transportation of bluegill may be restricted because of their susceptibility to viral hemorrhagic septicemia (VHS). Currently, bluegill from the states on the Great Lakes shoreline, including Canadian provinces, cannot be transported out of those regions without a certified health inspection. A health inspection is a complicated procedure. Contact the Missouri agriculture and conservation departments about certified fish health inspections.
Processing bluegill for food markets
Producers selling bluegill for food markets and human consumption must comply with local and federal food safety and processing regulations. The Food and Drug Administration's (FDA) Fish and Fishery Products Hazards and Controls Guidance provides information about the regulatory requirements for processing seafood for human consumption. The FDA also requires the development and implementation of a Hazardous and Critical Control Point (HACCP) plan. A HACCP guide and training can be found online at http://seafoodhaccp.cornell.edu/Intro. The guide provides information that can help in the development of a HACCP plan and provides additional guidance on complying with FDA regulations. Producers are strongly encouraged to thoroughly review relevant documents and take HACCP training.
In addition, be sure to check county and state health department regulations. Local restrictions may apply to selling and processing fish. The Missouri Department of Health and Human Safety provides helpful information such as guidelines to follow for seafood during electrical outages and during water boil order, health advisories and other relevant information. The Missouri Department of Conservation has developed an approved-aquatic-species list that specifies which species of fish can be raised for aquaculture purposes or for pond stocking. Bluegill sunfish is an approved aquatic species for these uses.
Bluegill brood-stock management
The capability of maintaining bluegill brood stock on the farm is extremely important. The risk of introducing disease organisms greatly increases when new fish are brought into the hatchery or into production ponds. Be sure that new fish brought in to the hatchery are certified as disease-free, and implement strict biosecurity practices during the transfer.
Maintaining brood stock provides a producer opportunities to initiate a selective mass-breeding program by holding brood fish over several growth seasons. When producing fish for food markets, selecting brood fish that are fast growers can be advantageous; the ability to reach marketable size in a short time is a desirable trait. An additional benefit of maintaining brood stock is having fish readily available when needed. If possible, rearing brood fish in their own tank or pond is advantageous and is even more optimal if the year classes can be kept separate.
Marketing
Successful marketing of your fish is crucial to making a profit. Develop a marketing plan before you invest capital resources and time into your operation. Wholesale and retail markets are available, but specific markets must be identified before the first crop of fish is produced. Fish sold directly to local retail markets usually command a higher price than fish sold to wholesale markets. However, local retailers are typically niche markets and often take time to develop.
Markets for stocker-size fish
Missouri has excellent markets for stocker-sized bluegill. Many neighborhood or homeowner lake associations, private ponds and lakes, and recreational areas provide markets for bluegill that can be readily stocked for angling. Individual pond and lake owners will also order live bluegill for stocking at various times of the year for remedial stocking. Fish of various sizes may be stocked in private lakes and ponds for recreational purposes. Bluegill fingerlings that are 2 to 4 inches long are often stocked with channel catfish and largemouth bass for recreational sport fishing. Larger bluegill fingerlings, 4 to 5 inches long, are often stocked to supplement populations in ponds and lakes. These fish are marketed at a specific size-class and sold live.
Some agriculture cooperatives and supply outlets organize an annual "fish days" event that provides an excellent venue for marketing and selling stocker-sized bluegill. Orders for a supply of fish are taken in advance, based on numbers and size range. Buyers congregate on a specific day, usually in the spring, with their buckets and haulers to purchase fish. In this case, the producer assures delivery on that date with the number and size of fish ordered.
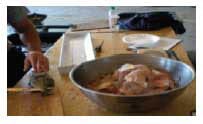
Live fish can be reared for stocking to grow-out, for feeder fish or for selling to another producer to grow-out. Processed fish can be be filleted or dressed out, and may need to be de-scaled, skinned or boned (Figure 17). The market will determine the final product. Processing fish is labor intensive; adequate staffing must be available to process the fish in time for delivery.
Marketing fish is not easy because established marketing channels do not typically exist, as they do in the cattle or swine industry. A good manager must be a seasoned marketer. Marketing is a skill and requires expertise that must be developed for a business to be successful. Often, cooperating with a seasoned fish farmer who has established markets is wise, especially for a new aquaculture business.
Conclusion
Opportunities exist in Missouri for producing bluegill for a variety of markets, including food markets and recreational pond and lake stocking. Potential producers should establish markets before making initial investments in any aquaculture enterprise, including bluegill production. New producers are advised to start small and develop expertise and gain experience in raising fish, managing water quality and understanding the production system to ensure that the enterprise will be profitable and sustainable. Reviewing additional research-based information, such as the publications listed under Additional information, is highly recommended.
This aquaculture guide is one in a series being developed jointly by MU Extension and Lincoln University
January 2014
