Oyster hatcheries provide juvenile oysters for commercial production, restoration projects and research. Oyster hatchery techniques are well established and many publications describe how to produce oysters (see Additional Reading). This publication covers the basics of oyster hatchery production based on information from previous publications and our own experience. The information is generally applicable to oysters in the genus Crassostrea and is most applicable to the eastern oyster, Crassostrea virginica, in southern waters.
Site Selection
There are many critical elements to an oyster hatchery, but none is more important than location, or more specifically, location relative to water supply. Oyster hatcheries require large volumes of clean sea water with salinities in the range of 15 to 30 parts per thousand (ppt). Salinity is not a major issue in many areas, but some estuaries have periodic episodes of freshwater inflows that can reduce salinity below 10 ppt. Low salinity water is not conducive to spawning, larval development, or early growth of young oysters. Turbidity, potential pollutants, watershed development, boat traffic, and natural algae production are other aspects of water quality to consider. The local agency that oversees oyster harvesting areas should be consulted in regard to regulations that might affect the use of oysters produced from the proposed hatchery site.
Hatchery Facility
Oyster hatcheries vary in size and shape depending on budgets and projected production. Most facilities have a separate pump station that brings saltwater from a nearby source to the hatchery. Having dual water lines and pumps provides a backup system and can also reduce the fouling of lines because one line can be allowed to go anoxic while the other is in use. Pumps and water lines are sized for the distance, height (head) and volume of water to be moved. Systems that can deliver 10 to 25 gallons (38 to 95 L) per minute simultaneously from multiple outlets will efficiently fill a number of large tanks and ensure adequate flow for growing oysters.
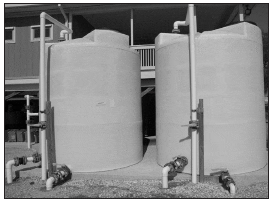
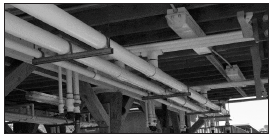
Before it enters the hatchery, water is often pumped to large holding tanks (Fig.1) where settling reduces turbidity. Or, the holding tanks can be bypassed and water pumped directly to the hatchery. Overhead water lines (Fig. 2) keep floor space cleaner and allow tanks to be filled directly.
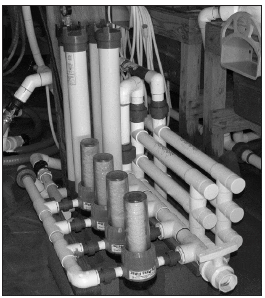
The plumbing is designed with a water filtration and treatment system consisting of some combination of rapid sand filters, cartridge filters, activated carbon, ultraviolet (UV) sterilization or pasteurization (Fig. 3). Treated sea- water is then suitable for larval and algal production.
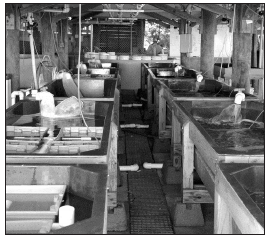
Tanks for larval production are circular, generally 250 gallons (946 L) or larger, and have center drains and sloping or conical bottoms. Drain pipes make it convenient to drain water and sieve larvae. An in-floor drain system (Fig. 4) that can handle the maximum expected water flow helps keep water off the floor.
Shallow rectangular tanks with drain pipes provide nursery space for juvenile oysters. Aeration throughout the hatchery is supplied by an appropriate size blower, overhead PVC piping, vinyl tubing, and good quality air stones.
If algal cultures are to be produced, there must be a clean room with special lighting for starting cultures. Another larger space with special lighting, separate from the main hatchery, is needed to grow larger volumes of algae.
Oyster Biology
An oyster hatchery simply creates a controlled environment for the early portions of the oyster life cycle. Therefore, producers must understand oyster biology. Oysters occur naturally in dense aggregations, often called reefs or beds. Oysters thrive in estuarine waters with salinities of about 10 to 25 ppt, though they can tolerate lower and higher salinities. Oysters on natural reefs are stimulated to spawn when the water temperature rises in the spring. The release of sperm and eggs into the water further stimulates other oysters to spawn. This results in a mass release of reproductive products.
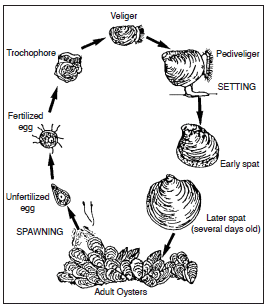
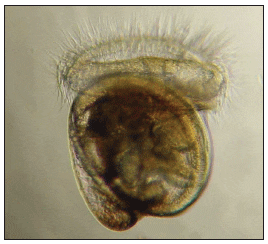
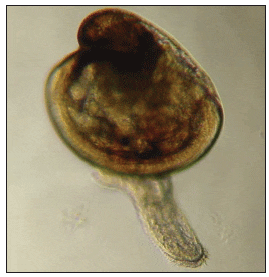
Sperm fertilize eggs in the water column. Fertilized eggs develop and progress through a series of freeswimming larval stages (Fig. 5.) over a period of 14 to 20 days, depending on water temperature. These stages are referred to as the trochophore, veliger and pediveliger. The trochophore larvae feed on very small algae as they move through the water column. Trochophore larvae quickly develop into more motile veliger larvae (Fig. 6). Toward the end of the larval cycle, pediveligers (Fig. 7) develop a foot that helps them find a suitable hard substrate on which to attach (set) and transform into small oysters. This stage is also called an “eyed larvae” because of the development of a pigmented eye spot.
Eyed pediveligers settle out of the water column when they are approximately 300 micrometers (?m) and may be stimulated to settle by the presence of adult oysters. Finding a hard substrate (cultch) is essential to their survival. The eyed larvae can move only very small distances, once they settle, in order to find a suitable spot. Once settled, they attach and transform into small oysters called spat. Spat soon begin feeding on algae by filtering water through their gills and a special structure (labial palps) located just in front of the mouth.
Basic Hatchery Procedures
These are the basic procedures for spawning oysters, raising and setting larvae, and growing spat. No two hatcheries operate identically or in the same environment and there is no substitute for experience.
Water Treatment
Good water quality is essential to successful hatchery production (see Site Selection) but even high-quality water must be treated to remove unwanted organisms. Water used for spawning, mixing eggs and sperm, and growing larvae is typically filtered mechanically and treated with ultraviolet radiation. Large-scale operations and “low-tech” or “back yard” facilities may forgo UV treatment but will use some mechanical filtration. Mechanical filtration is usually done with a pressurized sand filter, cartridge filters for smaller volumes, or fine-mesh bags. Because of the rich array of organisms in Gulf of Mexico waters, mechanical filtration down to 1 ?m with UV treatment can assist in successful spawning and larval production.
Spawning
Spawning oysters is the first step in the production of spat. As a rule, ten average females produce about 200 million eggs. Under good conditions 200 million eggs can result in 100 million or more early-stage larvae, which require 2,600 gallons (10,000 L) of treated water. Natural mortality and the need to thin out the larvae to proper densities should leave about 25 million eyed larvae ready for setting. Approximately 10 million spat can be expected from the 25 million eyed larvae.
Spawning is typically undertaken in the spring when water temperatures rise above 77 ºF (25 ºC) in southern waters. The process begins with selecting broodstock, which may be oysters taken from the wild or oysters bred and maintained under controlled conditions for selective breeding. In either case, oysters larger than 3 inches (76 mm) are selected, although males may be smaller, and then a sample is examined for reproductive readiness. Experienced hatchery personnel can judge the state of “ripeness” by removing the right or upper shell and noting the development of the gonads. Ripening gonads have many branching tubules or prominent genital canals. Gonads may also be cut and scraped and the material examined under the microscope for sperm and eggs. Mature eggs are pear shaped, 55 to 75 ?m long, and 35 to 55 ?m wide.
A significant amount of eggs and sperm can be produced by just a few oysters, but not every oyster may spawn and it is a good practice to have the eggs and sperm from several oysters. Therefore, 20 to 30 large oysters are thoroughly cleaned and scrubbed, then placed in a shallow, black tank containing 4 to 6 inches (101 to 153 mm) of filtered, treated seawater at the same salinity as the broodstock holding tank. After the oysters have had time to acclimate and open their shells, warm water (generally 9 ºF or 5 ºC above ambient) is introduced into the tank to induce spawning. Cycling ambient and warm water a few times may also stimulate spawning. If this fails to produce results in a reasonable time (about an hour), sperm stripped from a male can be delivered by pipette to the shell opening of several oysters to stimulate spawning. To prevent unwanted fertilization, sperm used in this procedure can be placed in a microwave oven for 20 to 40 seconds to eliminate viability. These sperm should be checked under a microscope to be sure there is no motility.
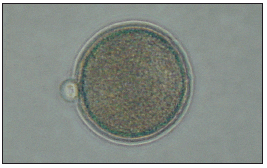
When oysters begin releasing gametes, the whitish sperm and eggs can be easily seen against the black background of the tank. Males release a near constant stream of sperm and females release eggs during periodic shell closures. As oysters begin to spawn, males and females should be placed in separate containers (1 gallon or 2.2 L) containing treated sea water to prevent uncontrolled fertilization. When females appear to have finished spawning, they should be removed from the containers and the containers aerated. Within 45 minutes of spawning all the eggs can be sieved on a 50-?m screen to remove debris. Eggs are then combined in one or several aerated containers and fertilized with a small volume of sperm (20 to 50 ml) combined from three or more males. After 15 to 20 minutes, eggs should be examined under a microscope to confirm fertilization. If no more than 10 percent of the eggs have a polar body (Fig. 8), more sperm should be added. When eggs appear adequately fertilized, the egg container is brought up to a standard volume such as 2.6 gallons (10 L). (Note: It is simpler to work in the metric system and the metric system is followed for small measures, while the English system is referred to where possible.) The eggs are gently mixed and a 1-ml sample is taken with a pipette. The sample is placed on a Sedgwick–Rafter cell (a special microscope slide that holds 1 ml of liquid) and the number of fertilized eggs counted. The sample count is then multiplied by the volume of the container, in this case 10,000 ml (there are 10,000 ml in 10 L), to get the total number of fertilized eggs per container. This figure is used to determine the volume of water containing eggs that is needed to stock the larval tanks.
Fertilized eggs are stocked into larval-rearing tanks usually 250 gallons (946 L) or larger at the rate of 40,000 to 80,000 per gallon or about 10 to 20 eggs per ml. The following formula can be used to determine the volume (ml) from the container of eggs needed to stock the larval rearing tanks:
Stocking rate ÷ eggs per ml = ml from container of eggs to add to larval rearing tank
Example: If the egg count in the previous step revealed 10,000 eggs per ml and the stocking rate for a 250-gallon (946-L) tank is 10 million eggs, then:
10,000,000 eggs stocking rate ÷10,000 eggs/ml = 1,000 ml from the container of eggs.
Algae can be added the same day to provide food for fast developing trochophore and veliger larvae.
Larval Care
Tanks are cleaned, disinfected with sodium hypochlorite (bleach), and filled with treated sea water before they are stocked with fertilized eggs. Tanks should be gently aerated so that eggs and subsequent larvae are mixed throughout the tank. From this point until larvae are ready to set, larval care consists of feeding algae, draining tanks every 2 days (daily as larvae near setting), sieving and counting larvae, cleaning and refilling tanks, and restocking larvae at the appropriate density. Table 1 outlines a schedule for draining, the suggested mesh size for sieving, the larval density, and the food density.
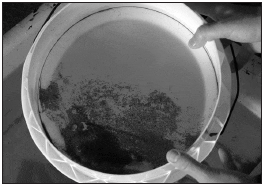
Most fertilized eggs develop into trochophore larvae within 12 to 20 hours. These become veliger larvae (also called straight-hinge or D-shaped larvae) within 20 to 48 hours. The first draining and sieving (Fig. 9) is done at about 48 hours. Water is drained slowly through the appropriate size sieve (Table 1) and the retained larvae are placed in a known volume of treated seawater (e.g., 10 L). Several 1-ml samples are taken, the larvae are counted in a Sedgewick-Rafter cell, and the average number is used to calculate the total number of larvae, as in the egg count. Larvae are restocked in a cleaned and disinfected tank filled with treated seawater at the recommended density, five per ml or about 20,000 per gallon. This process is repeated every 2 days (daily as larvae near setting) with appropriate reductions in larval density (Table 1) until larvae are ready to set.
Feeding
Oyster larvae feed by filtering small, single-cell algae from the water. They must be supplied with the right size food at a density that makes the food easy to encounter. There are several methods for supplying algae to larvae. The simplest is to coarsely filter (10 to 25 ?m) natural waters to keep out zooplankton and large algae and then provide the water directly to the larvae. A second method involves filtering natural water in the same way and then fertilizing it to stimulate algae growth and reproduction. After a significant amount of algae is produced, it is fed to the oysters. Both of these methods have worked for hatcheries but the results can vary considerably; and, the water can be contaminated by unwanted zooplankton or the wrong kinds of algae.
A third method is to separately culture several species of algae from pure cultures of each desired species. Algae species that have been used to grow oyster larvae include Chaetocerus gracilis, Isochrysis galbana, Pavlova spp., and Nannochloropsis spp. Several studies have shown that a mix of algae species results in better growth. Culturing algae can be labor intensive, requiring repeated sterilization of glassware as the algae is moved through a series of larger containers. Several continuous culture methods have been developed that can reduce labor and provide larger volumes. See the Additional Reading section for sources of more detailed information on culturing algae.
| Days of Larval Culture, size of Larvae (Long Axis in ?m), Sieve Size in ?m, Suggested Larval Density, and Algae Density for Larval Culture Tanks (modified from Creswell et al. 1990). Sieve size is given as one side of a Square Opening. Number in ( ) is Diagonal Opening. | ||||
|---|---|---|---|---|
| Days after spawn | Larval height (?m) | Sieve size (?m) | Larval density (larvae/ml) | Algae density (cells/ml) |
| 0 | 10 | 20-25,000 | ||
| 2 | 65 | 35 (50) | 5 | 20-25,000 |
| 4 | 100 | 53 (75) | 5 | 20-25,000 |
| 6 | 140 | 53 (75) | 4-5 | 30-40,000 |
| 8 | 180 | 73 (103) | 4 | 50,000 |
| 10 | 220 | 73 (103) | 4 | 50,000 |
| 12 | 260 | 100 (141) | 3 | 70-80,000 |
| 14 | 290* | 118 (166) | 2.5 | 100-150,000 |
| *See text for sieving eyed larvae. | ||||
A fourth method is to purchase concentrated algae from commercial producers. While often expensive, commercially produced algae may be cost effective depending on the size of the oyster hatchery.
However it is obtained, algae must be added daily to the larval culture tanks at concentrations that result in the densities listed in Table 1. Intensively cultured algae are very dense and often a diluted subsample must be counted. To do this, a drop of diluted culture water is placed on a hemacytometer (a special microscope slide with finely etched squares to aid counting) and the cells within several 1-mm-square areas are counted. The cell count is divided by the number of 1-mm-square areas counted and then multiplied by 10,000 to get the cells per ml. This number is then multiplied by the dilution factor.
The volume of culture water needed to achieve the desired density in the larval tanks is determined from the calculated density of algae. For example, if the hemacytometer count shows 100 cells in four 1-mm-square areas, the number of cells per 1-mm-square area is 25. Multiply by 10,000 to get 250,000 cells per ml. If the sample was originally diluted by a factor of 10, multiply by 10 to get 2,500,000 cells per ml in the original culture.
The desired density of algae at the beginning of larval culture is 25,000 cells per ml. Suppose the larval tank is 250 gallons (946 L). Multiply the larval tank volume (946,000 ml) by the desired algae density (25,000 cells/ml) and divide by the density of cells in the algae culture (2,500,000 cells/ml) to get 9,460 ml of plankton culture to be added to the larval tank.
Setting Larvae
Larvae are ready to set when they have a well developed eye spot and are 290 ?m or more in length. Larvae that are ready to set are usually selected by sieving them through a 180-?m screen (254-?m diagonal opening). Larvae that pass through are restocked. The retained larvae are sieved again on a 210-?m screen (296-?m diagonal opening). Those that pass through are also restocked to a separate tank. The retained larvae (larger than 296 ?m) are pooled and counted before being transferred to setting tanks. This procedure is repeated every day until the desired number of eyed larvae is obtained or the number of eyed larvae dwindles to the point that it is no longer effective to continue.
The large, eyed larvae can be set on a variety of materials (cultch) using several methods. The choice depends on the desired use of the resulting spat. The two basic choices are producing single oysters (good for research and/or off-bottom farming for the half shell market) and producing oyster clusters (good for producing a lot of oysters for restoration projects and/or farming aimed at the shucked meat market).
Single oysters can be obtained by setting larvae on microcultch, very smooth and slippery surfaces, or by chemical induction. Microcultch is usually made of finely ground oyster shell sieved to produce shell pieces 250 to 300 ?m in diameter. A single larva sets on each particle. Oyster larvae also can be set on a slippery, flexible surface such as Mylar® sheets. After larvae have metamorphosed to spat they can be popped off the sheet. Chemical induction involves treating larvae with chemicals such as epinephrine or norepinephrine at very low concentrations to induce metamorphosis without the need for a substrate.
Cluster oysters are the result of setting larvae on large cultch, usually whole oyster shell. This results in a product similar to what occurs in nature—a shell with many spat. Over time, natural attrition results in two to four adult oysters per shell. Almost any non-metallic, hard surface could function as cultch for cluster oysters. All types of cultch should be clean and “aged” in seawater for several days to establish a “biofilm” on the cultch that will enhance setting.
Single Oyster Setting
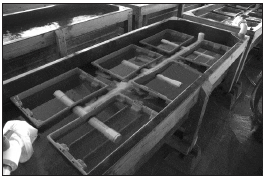
Single oysters are produced by introducing eyed larvae (250 larvae per square inch or 100 per square cm of bottom surface area) into containers with fine mesh bottoms (l50- to 180-?m) and a thin layer of microcultch. The containers, called wellers, are immersed in shallow tanks containing treated seawater (Fig. 10). Containers are configured so that water can flow up through (upwelling) or down through (downwellng) the mesh bottoms by routing water through an opening near the top of the container. (See SRAC Publication No. 4301 for diagrams). At stocking, the container is set for downwelling and the entire tank covered with black plastic to encourage more even setting. Algae is added to feed late-setting larvae and early metamorphosed spat. Setting and metamorphosis usually takes 48 hours. After metamorphosis is confirmed, the containers are converted to upwellers using coarsely filtered (100 ?m), flow-through sea water.
The bottom mesh on the upwellers should be cleaned daily. As the spat grow they are graded on different mesh size sieves and the larger spat moved to upwellers with larger mesh bottom screens to enhance water flow and growth. Growth is highly dependent on the density of spat, water flow, and the abundance of natural food in the water supply. Food can be supplemented with algae as in larval feeding.
Single Oyster Nursery
The major drawback to single oyster production is the amount of labor required to maintain oysters until they reach the desired size. The initial upweller culture continues until oysters are large enough to be placed in the smallest mesh size nursery bag. These bags can be kept in the hatchery under high water flow or placed in natural waters off-bottom. The small mesh size of the bags makes regular cleaning necessary. As the oysters grow they are sieved through appropriate size meshes (slightly smaller than the mesh size of the bag they are being put into) and the retained oysters moved to larger mesh bags. The larger mesh bags also require periodic cleaning and inspection for predators in the bags. An example of mesh sizes and stocking densities is given in Table 2.
| Typical Mesh Size of Oyster-Growing Containers (Bags) and Suggested Stocking Densities. | |
|---|---|
| Bag mesh | Oysters/bag |
| 0.04 in (1 mm) | 50,000 |
| 0.08 in (2 mm) | 10,000 |
| 0.13 in (3.3 mm) | 4,000 |
| 0.25 in (6.4 mm) | 1,500 |
| 0.50 in (12.7 mm) | 500 |
| 0.75 in (19 mm) | 250 |
Given the labor costs of growing single oysters, it is very tempting to release single oysters onto suitable bottoms at a small size. However, several studies have shown that the mortality of small, single oysters is quite high when they are not protected in bags or some kind of container.
Setting on Large Cultch
Setting on whole shell or other large cultch can be done by placing the cultch in large mesh bags and the bags into tanks with treated seawater. Eyed larvae are introduced at the rate of 100 per shell, with a goal of obtaining 10 to 30 early spat per shell. Gentle aeration is applied, algae added, and the tank covered. After several days, the tanks are supplied with a continuous flow of coarsely filtered sea water. Bags of cultch should be washed occasionally and tanks drained to remove wastes. To reduce hatchery costs, bags can be moved after 1 to 2 weeks to protected waters with firm substrate and a history of growing oysters. When oysters reach a size that protects them somewhat from predation, and before they grow through the bags, they can be removed from the bags and spread on suitable bottom substrates.
Significance
Oysters are an important component of seafood production and provide widely appreciated ecological services. Oyster hatcheries can produce oysters for commercial culture operations, restoration projects, and a variety of basic and applied research projects. Oyster hatcheries have played an important role in breeding disease-resistant oysters, triploid and tetraploid oysters, and faster growing oysters.


